Wednesday, October 25, 2017

Mask / Face Measurement Guide


1. Eye Brow Circumference - Starting from Eye-Brow level or just above the ear get the full measurement around the head.


2. Ear-to-Ear - Get the measurement from one side of the ear going at the center of the eyes and ending at the other side of the ear.


3. at the nose line, start at the midpoint of the two eye brows going straight down at the desired length.


4. Ocular Measurement – get the Height at Width of the eyes to get the measurement of the hole around the eyes


5. Get the desired measurement of the side face near the ear
6. Just like in number (5) get the measurement across the eye brow and eye.


Saturday, October 21, 2017

Halloween Costumes 2017

HALLOWEEN IS COMING!! Are you ready? Culturally in Philippines, Filipinos do not celebrate it as much as in Americans Halloween celebration called trick or treat. But eventually we strongly adapts it, since this celebration seems fun and unknowingly it makes the community united after visiting their left loved ones, so why not.

To those who does not know yet. Halloween is celebrated by almost all ages as long as you’re in the mood. You can wear your scariest costumes, funny and cleverest ones are even possible!

Kids’ activities during Halloween were simply collecting sweets at their neighbor it’s called trick or treat, knocking at someone’s door, and loudly saying TRICK OR TREAT! The fun there is that the house owner as what I have known is, they should choose between the door knocker options, whether to trick them or hold-them up to give what they want! Indeed the sweet candies. But of course in reality, the house owners already prepared their candies ready to give-away.


Adults Halloween Celebration and activities:

Halloween celebration for adults can be in any form it might be in parties , games, fashion show, etc.

Well whatever form celebration your Halloween is, when you say COSTUME it is inevitable during this event.

At Costume Store Philippines, Halloween means EFFORT and PASSION to us as we accept a variety of customized costumes, made to order but as of now we do not have yet Halloween costumes for rentals we may sell a few products but its limited.

Believe it or not, people want the best outfit to wear in the event. People want to stand out and become an apple of the eye of the crowd for a moment. In the Philippines, there are stores that offer ready-made costumes for different events like Divisoria and costume stores that also offer a costume for rent/sale. But the only thing is that they found it mainstream, the costume is always the same all year round they become bored on how it looks over and over.

That is why some customers commissions us as we make unique costumes, will it be based from our preference design or directly from our clients. It may be a little pricy but it’s worth after you worn it.

Here are some of our sample works,

Here is our version of Little Devil Costume For Babies It includes Mini Trident, Devil’s Horn, Devil Wings,


Back View of the Little Devil Costume

Front view of the Costume From the same client we receive another costume request, but this time a cape for Halloween also, Here is a Vampire Cape:


Setback

During the Process we planned whether to separate each part of the whole costume, or make it as one whole costume. We never anticipated that if we make it as a whole we will encounter a future problem,

as we proceed we’ve decided to make the costume as one whole, we put a long zipper at the back, but as our customer tested the costume the body of the baby does not fit at the zipper . it was a failure but we learn about the mistake afterwards.

after these project we learned not just the mistake but also to carefully anticipate about future problems that we may encounter.

Thursday, October 19, 2017

How to make Mulawin Costume Part I (Head Dress)

Part I - How to Make Mulawin Head Dress


Core Tools:
-Pliers
-Scissors
-Glue Gun
-Mannequin (Optional) / Own Head
-Measuring Tools

Core Materials:
-Hot Glue
-Feathers
-Fur
-Wires
-Foam

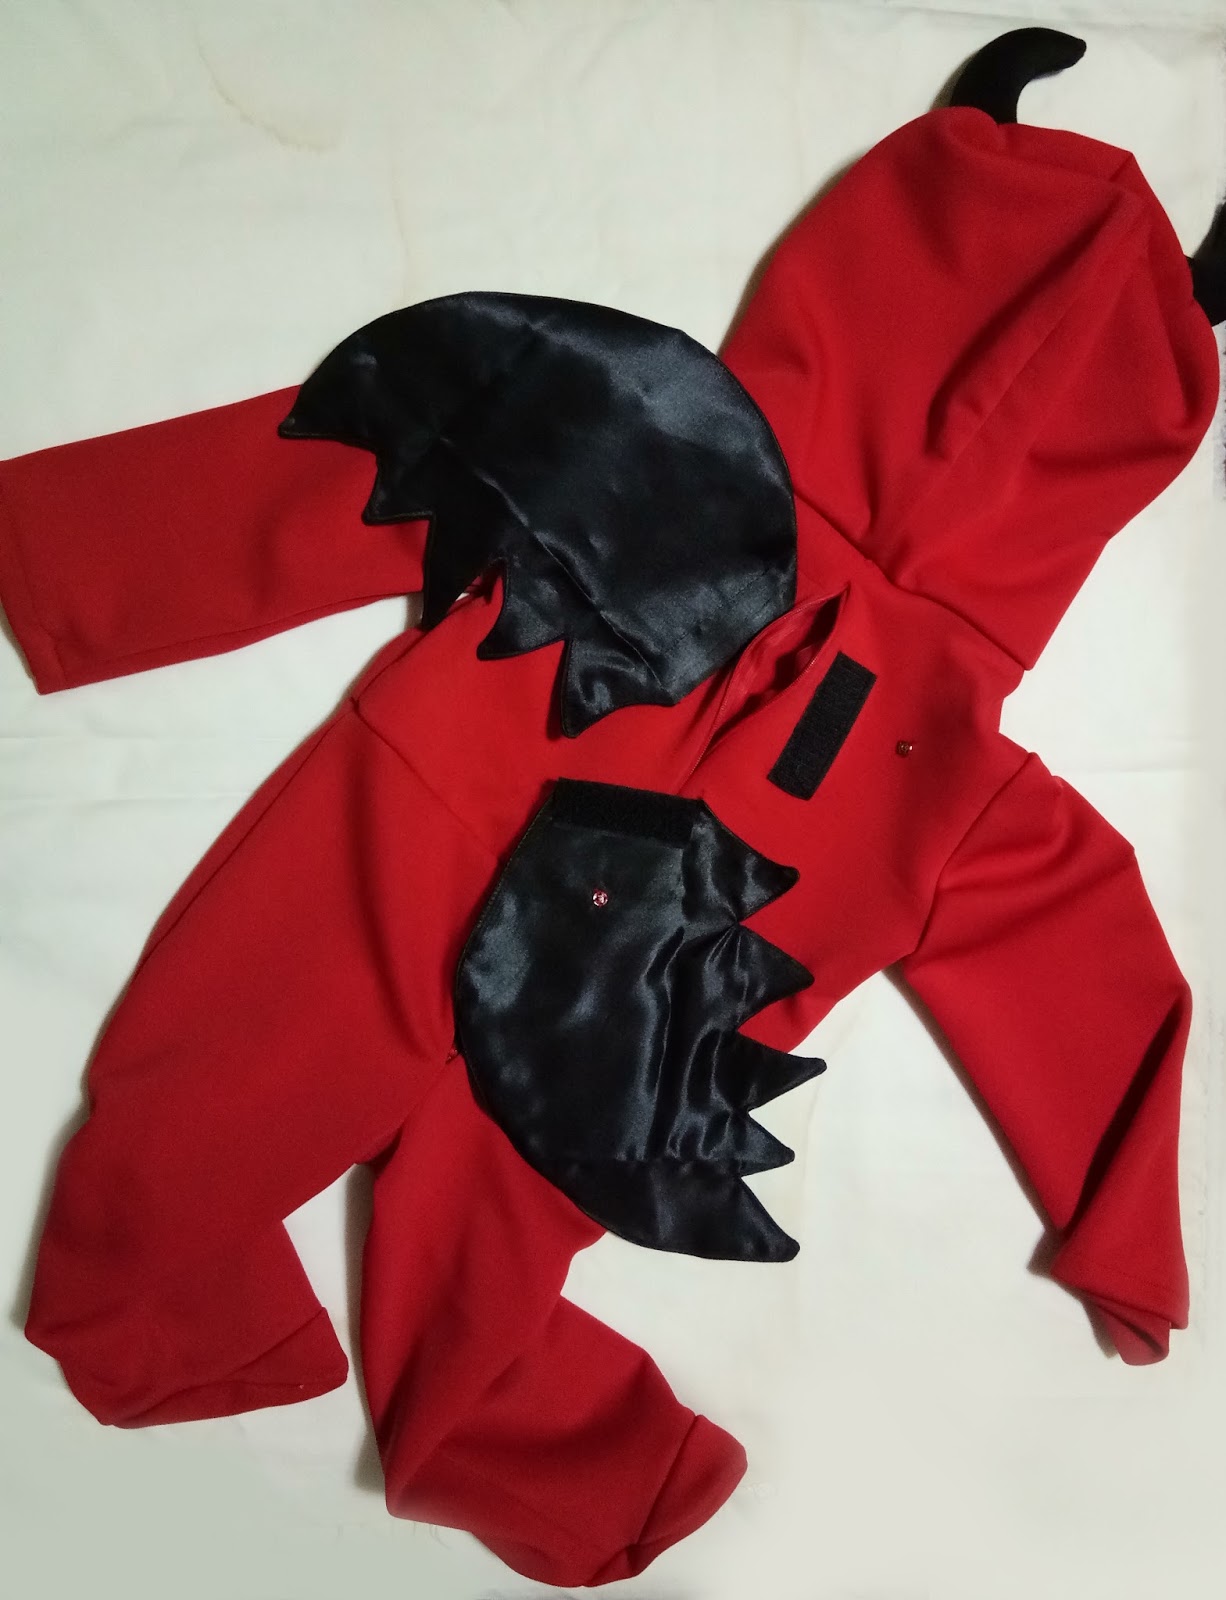
Mulawin Overall Costume Tools and Materials

Besides from the “Core Tools And Materials” you may want to sneak to the overall tools and materials we used in the making the whole Mulawin Costume.

Materials used:
-Foams (for armors, I used light green color foam because the target color for armor is dark green it readily served as the base color)
-Thin foam (for Wings)
-Spray Paints (Dark Green, Black, Gold, and Brown)
-Acrylic Paint (Color:Green & Dark Green - used in telon feathers)
-Telon (used for hardening the fabric collars, we used it for big feathers)
-Natural Feathers
-Green Dye (for colorizing white natural feathers)
-Adhesives: Rugby, White Glue, Max Bond Glue (for adhesives) you can use any adhesive agents
-Garter
-Feathers (Color: Light Green, Natural Brown, White & Black - for wings and head dress)
-Fur (Light Brown)
-Towel (Cream color – used for skirt)
-White Strings (rope like)
-Wires (for base) & Floral Wires (for interlocking wires)
-Bag Straps (for Wings)
-Strap/Plastic Adjusters
-Quick Release Buckles (used for locking the strap)
-Buttons(For Decoration)

Tools:
-Soldering Iron (for texturing the foam)
-Glue Gun & Glue Sticks
-Scissors or Cutters
-Measuring Tape
-Sand Paper (For sanding the armor foam)
-Plastic foils and Packaging Tape (for getting the form of the mannequin or body – Body measurement)
-Mannequins
-Pliers

Wanted to know how much it cost before you create your own Mulawin costume? Well it takes a lot of effort, time, tools and materials. Its more than a penny or money, but for sure you’ll enjoy doing it so let’s get started.

I give it a 4 star difficulty


Prepare Every Tools and Materials
to keep the creative juices flowing you need to prepare everything before you get started.

Know where you would like to start
Starting is the hardest part, we all know that, but to get you moving, keep your hands busy start to whatever part you feel like starting. To have a peace in mind we can give you an idea. There are no standards but you can start top to bottom, front to back, starting from head dress > Upper Armor up to Lower Armor > and lastly the wings.

Step 1 – The Head Dress Base & Feathers


1.a ) Mulawin Head Dress Base
If you have a head mannequin like this you can easily form the wires and foam. Aside from mannequin you can use your own head if you’re the costume user.


Wrap around the wires to the largest circumference of the forehead, put small ellipses at the end of the wires to make them adjustable,
Cover the wires with foam based from the form of the head measurement.

Tips on how to get the head curvature, you can wrap plastic foil to the head and tape it, you can use packaging tape to layer the wrapped plastic foil, then draw the shape of the head dress directly after you apply the tape.

Here is the visual process.


After you draw the shape of the base of the head dress you can now use it as a template. Quarterly cut the template out of tape and foil so you can flatten them.

Each cut piece of template will be traced to the foam, after you trace and cut the foam, bond them using super glue, I used Rugby, when applying the Rugby, make sure the surfaces are smooth and clean, let them dry a little for about 15 min/s. so it will strongly adheres,

When you glued the pieces of foam together it should automatically form a concave shape of the head, like from the photos in “wires and foam”

1.b) The Head Fur and Feathers


When shaping the fur, imagine a long hair attached at the scalp you can make a symmetrical shape from both sides of the head temples, then another long rectangular shape at the middle, To fully cover the foam.

Attached the fur at the foam using any adhesives, for me, I used Rugby because it quickly adheres to the material. The only negative thing about Rugby is that it has a negative effect on health, so wear mask as much as possible and make sure you are in an open space so air can freely flow.

Colorizing the Fur
As you can notice the fur we made has a touch of dark brown, and dark green at certain parts, We used Spray paint, as of our experience it may be advisable coloring the fur material as it does not hardens the fur, it can also be comb if you want to arrange the flow of the fur/hair.


The Feathers
The layering of feathers is the most enjoyable part, it may distress you “I promise”. To better arrange the feathers start at the bottom going to the top most part of the head dress which is at the forehead and make sure you have a reference photo or guide search in the internet from a lot of birds or directly to Mulawin characters itself.

I used hot glue and glue gun to attach the feather to the fur. Tip! hot glue it at the end root of the feather, not to the fur and most importantly attach the root of the feather at the scalp/fabric of the fur so the feather won’t dangle and easily be removed when you just hit something.

Yey you're now done with the Mulawin Head Dress, tell us whats on your mind.
If you would like to go to the next mulawin tutorial Click Here, for Part II - How to Make Mulawin Armor

Wednesday, October 18, 2017

Free Vector


Wanting to give a difficulty visualization for your next tutotials? you can download it for free, you can also edit it to change its colors and other features. feel free to download it here:

Here is the over all zip file: Download Here

Or you can simply download it individually here:


1 star


.5 star


1.5 star


2 star


3 star


2.5 star


3.5 star


4 star


4.5 star


5 star


Here you go, Enjoy!

Tuesday, October 17, 2017

Mulawin Costume/ Bird Costume

Mulawin Costume


Mulawin Costume
This is the Wings we made for one of our client


Mulawin at the present times is still popular in terms of costume events like in; cosplay events, local fashion shows (they may get some fashion ideas), kids birthday party, or even upcoming Halloween parties. Mulawin was aired and made popular from one of the famous local channel in the Philippines named GMA usually found at channel 7 in television.

Mulawin was once a big hit, back from when I was still in grade school. I even watched it daily in the evening while having dinner, I remember back then, wherever I go it was being talked about. Mulawin started on August 2, 2014 with high ratings throughout the entire show run, it last up to 8 months.

After the high rated Mulawin show ends, GMA decided to make a movie before the 2015 year ends. It was even sold from other Asian countries like in Indonesia and Cambodia.


Where can you find Mulawin Costume?

Well Divisoria for sure is a one stop shop for everything, including any kind of products and costume. There’s a lot of reason why you should buy in Divisoria but most of us know that this market is for people who have lots of patience -- strong enough to shoulder the traffic and ready to dive in to the crowd. Not to be biased I can still enjoy buying stuffs from Divisoria, in the end it is still your purpose.

We don’t know exactly what malls can offer mulawin costume but if you’re persistent enough for sure you’ll find one.

Online Costume Store, Being one of the biggest costume shop in the Philippines the Costume Store Philippines offers high-quality costumes including the Mulawin Costume.

What does Mulawin looks like?

This is the original sample photo of a Mulawin, He is Aguiluz one of the main character in Mulawin photo from GMA pictorial (This photo is from google)

Mulawin is a half human half bird creatures, they can transform whenever they want as long as they got the “ugat-pak” - it can be described as large feather that is sought to be pierced at the back of the waist so you can be a bird and vice versa if you remove the ugat-pak they become just ordinary human.

Mulawin can be easily distinguished by their large wings so they lift the weight of a human sized-bird. They also have this furry feathered Head dress just like in any other birds. They also have armors, when it comes to combating their enemies Ravena’s (which is also the dark side of the mulawins)


Anatomy/Parts of Mulawin Costume

Here are the parts of the overall mulawin costumes:

Mulawin Head dress


Mulawin Armor


Mulawin Armor

Mulawin armor linings

are sold separately, including the skirt, bands, and other fabric accessory


Mulawin Wings (Winged Feather)


Mulawin Wings
Size 3 Ft tall and 2.5 ft wide

What kind of Mulawin costume you can request from us

Here is the list of Mulawin characters to be inspired of:

Characters

Aguiluz
Alwina

Some of armored supporting characters:

Bathalang Dakila
Bagwis
Habagat
Aviona
Vultra/Violeta/Veronica
Rasmus
Kuwak/Makisig
Tuka
Pagaspas/Gas
Lawiswis/Wis

(You can search at any engine sites for their reference photos)

In the next part you will see our original works including some tips and tutorials. See the whole process here

Our Costumes are for all ages
Mulawin Costume for kids
Mulawin Costume for Adults


Monday, October 9, 2017

DIY War Bonnets or Indian Head dress Part II

Welcome back! and now we will continue working with How to make Indian Head Dress Part II

HOW TO MAKE INDIAN HEAD DRESS / DIY INDIAN HEAD DRESS PART II


Step 4 – The Feathers The feathers we wanted has 2 colors in it sky blue from roots and black from top, the base color of the feather is black, which is by that time only available in the market, this color wasn’t easy to change color, so we think on how make the roots to be sky blue.

Colorizing Feathers

Bleaching vs Brush Painting vs Spray Painting vs Dying – we have tried these various methods but we only choose 1 mode for colorizing black feathers.

Since it is colored black, just like hair in Asia, we decided to bleach it to remove the natural black color. It won’t totally remove the color instead it becomes blonde.


Here is the process of bleaching and here’s the products we used.

Make sure you use gloves.


1 solution and 1 bleaching powder, we used the ratio 1 is to 1 if im not mistaken.


Here is the result, although we remove the natural black color, we do not recommend it for further colorizing, dying , painting or even spray painting. Why? Since it’s bleached it destroyed the natural form arrangement of the feather, plus it makes the feather brittle.

We also tried acrylic painting only, not also recommended because it also altered the form of the feather. Not recommendable…

Spray Painting
From different modes we choose spray painting since its, maintains the original form of the feather plus it gives vibrant colors and perfect gradient to the feathers, here’s what we did.


We tape the feathers individually and align it to plywood so there will be less waste spray paint. But make sure you don’t compress them closely.


I then now spray the roots evenly at first, letting them dry for a minute then comeback for the second up until third coats.


Step – 5 Completing the tail feather


This was the finished tail feather ready to be mounted to the base of the head dress. This is consist of a 2 pieces feather for each rolled brown poly canvass fabric(light brown), yarns, and (black) fur. Inside the rolled poly canvass contains a barbeque stick holding the fur and feathers roots so they will stand up straight.


You can see a simple instruction we provided. Just a tip, end your yarn at the back of the tail feather.


Step 6 - Base cover


Before you put the decorations on the cover you’ll need first to put holes.


The cover is also hot glued to the base,

The white laces from the base was carefully inserted to each individual top hole of the cover, once the white lace got back from the same hole it was inserted at first and after inserting also the tail feather. The white lace should also be glued to the back of the base.


This is how it should look like now decorated with beads, tail feathers and formed x white laces; the excess leatherette will be later hot glued at the back of the base, which serves also a cover from the white laces at the back of the base.


Step 7 - The Side Decoration


The side decoration are made up of white thin foam that is punched at the center for those leatherette lace, this thin white foam is bordered with circle leatherette. It also includes long furs, length up to shoulders.


Step 8 – Polishing


We also put nylon so they won’t make large gaps, and act as support for each tailed feathers.

Tip you can add hot glue to some parts of the tailed feather to position them better.

Tadaaaa!!!


The Finished Product


Looks cool at leafy or green Background


And you're done! Thanks you! See more tutorials here


No time making your own native american head dress? let us provide it for you. just comment, contact or pm us through our fb page so we can discuss it. thanks again and enjoy!~